Wednesday 30 March 2016

The Naked Series: Rosy Smoky Eye FT Urban Decay Naked 3

NAKED 3 TUTORIAL/URBAN DECAY, MAKEUP, TUTORIAL, ROSE

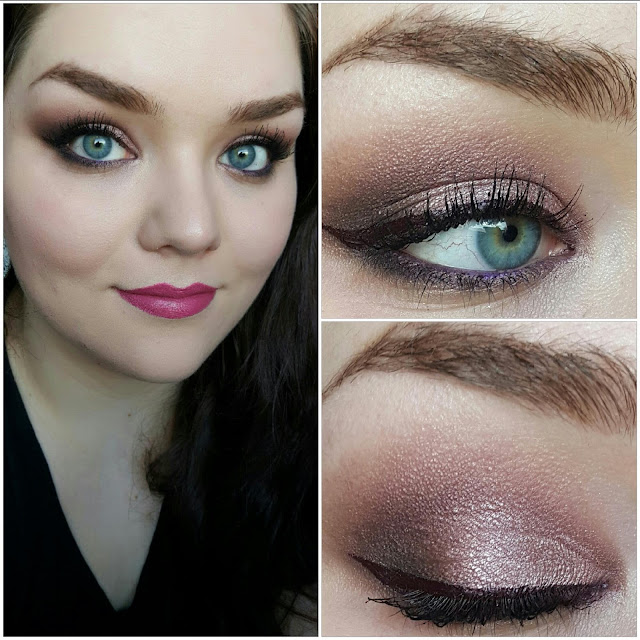
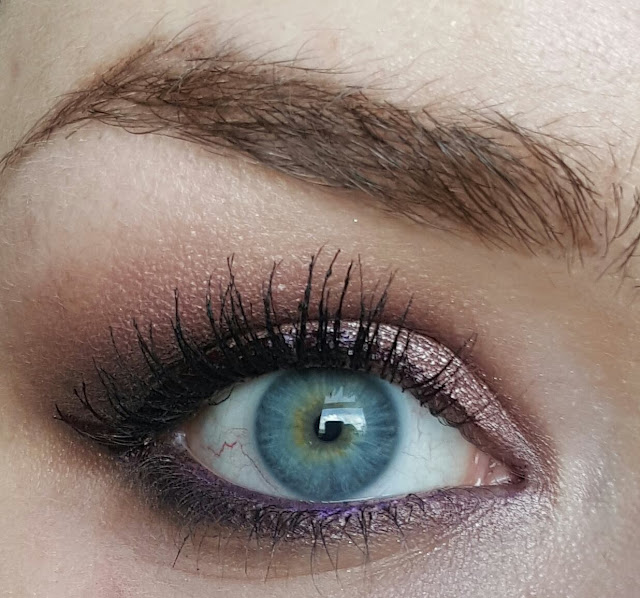
Hey guys! Today I decided to play around with an oldie by a goody - the beauty Naked 3 palette. Using its vast array of pink tones, I created a rather neutral eye, but added a bit of a kick with the burgundy liquid liner and royal purple waterline. I hope you enjoy!

NAKED 3 TUTORIAL/URBAN DECAY, MAKEUP, TUTORIAL, ROSE

NAKED 3 TUTORIAL/URBAN DECAY, MAKEUP, TUTORIAL, ROSE

NAKED 3 TUTORIAL/URBAN DECAY, MAKEUP, TUTORIAL, ROSE

Finished look

_________________________________________________________________________________

Other products used...

- Nyx Micro Brow - Brunette
- Illamasqua Precision Ink - Havoc
- Bourjois Healthy Mix Foundation - Vanille Clair
- Kiko Colour Corrector Primer - Green
- Nyx Blush - Taupe (contour)
- Clinique Cheek Pop - Rosy Pop
- Urban Decay 24/7 Glide-On Lip Pencil - Turn On
- Urban Decay Revolution Lipstick - Turn On

Sunday 27 March 2016

Aqua Eyes with Double Wing Tutorial


Happy Easter everyone! I know this look isn't very Spring appropriate, but I felt a bit icy, y'know?! Hope you enjoy!


Finished look

_________________________________________________________________________________

Products used

Eyes:
- Maybelline 24 hr Colour Tattoo - Turquoise Forever (step 1) 
- UD Eyeshadow - Password (In Naked Smokey - Step 2)
- UD Eyeshadow - Dagger (In Naked Smokey - Step 3)
- Barry M Dazzle Dust - 68 (Step 4)
- Barry M Dazzle Dust - 20 (Step 5) 
- Maybelline Eye Studio Master Precise - Black (Step 6)
- Essence Princess Lash (Step 6) 
- Me Me Me Enchanted Eyes Dual Ended Eye Wand - Midnight Storm (Step 7)
- Kat Von D Ink Liner - Baudelaire
- Nyx Micro Brow - Brunette

Face:
- Kiko Colour Corrector Primer - Green
- Bourjois Healthy Mix Foundation - Vanille Clair
- MAC Mineralize Skin Finish - Lightscapade
- UD Gwen Stefani Blush Palette - Lo-Fi (contour) and Cherry (blush)

Lips:
- NYX Lip Liner - Rose
- UD Revolution Lipstick - Illicit
- MUA Intense Kisses High Intensity Gloss - Sweet Nothings

- Soph 

Friday 25 March 2016

Blazing Fires: Sleek Sunset Palette Tutorial


Hellooo! And welcome to another edition of Sophie-likes-warm-reddish-colours-a-bit-too-much. I know this look starts out looking like an homage to KFC, but when you start adding the dark smoky tones, I think it's really gorgeous. I paired it with a bold red lip topped with an orange Barry M Dazzle Dust to really emphasise the fire theme, and I LOVE IT.

I achieved this look using probably one of the best high street make-up palettes there is: the Sleek Sunset Palette


This palette is £8. EIGHT POUND. And it's amazing. Go buy it. Now.

Onto the tutorial:


_________________________________________________________________________________

Other products used:

Eyes/Eyebrows:
- Essence Lash Princess Mascara
- L'Oreal Superliner Black Intense
- Urban Decay 24/7 Glide on Pencil - Rockstar
- NYX Micro Brow - Brunette
- NYX Control Freak Brow Gel

Lips:
- Stila Liquid Lipstick - Fiery
- Barry M Dazzle Dust - 71 (patted onto centre of lips)

Face:
- Kiko Skin Tone Corrector Primer - Green
- Bourjois Healthy Mix Foundation - Vanille Clair
- Makeup Revolution Ultra Professional Contour Palette (contour and highlight)
- MAC Sheertone Blush - Peaches

- Soph

Monday 21 March 2016

Metallic Silver and Purple Glitter Eye - Tutorial


Silver and purple are just such great friends, aren't they? And what better way to compliment this beautiful friendship than with a crap tonne of glitter eyeliner? (It's been a long day again). I hope you enjoy this sexy, kind of futuristic and if I may so so wearable (I know, I know) eye look.

_________________________________________________________________________________

Products used:

Eyes
- Benefit Cream Shadow - Holy Smokes! (step 1)
- UD Eyeshadow - Oz (exclusive to the Glinda palette) (step 2)
- UD Eyeshadow - Blackout (step 3)
- UD Eyeshadow - Tornado (step 4)
- UD Eyeshadow - Magic (exclusive to the Glinda palette) (step 5)
- L'Oreal Superliner Perfect Slim Black Intense (step 6)
- Zoeva Graphic Eyes - New Jewels (step 7) 
- Collection Glam Crystals Gel Eyeliner - Shake It Up! 
- Essence Lash Princess
- Anastasia Brow Pomade - Dark Brunette

The Rest
- Kiko Skin Tone Corrector Primer - Green
- YSL Teinte Touche Eclat Foundation - BR20 (Cool Ivory)
- TheBalm Mary Lou-Manizer 
- Clinique Cheek Pop - Rosy Pop
- Makeup Revolution Lip Lava - Tremor

- Soph


Sunday 20 March 2016

Kiko Colour Sphere Eyeshadow - Review and Swatches


Kiko Colour Sphere Eyeshadow (£5.90 from kikocosmetics.com)

In their words: 'Baked silk effect eyeshadow, brilliant and easy to blend. Rich in illuminating pigments and multifaceted pearls for a special effects texture. May be used wet or dry to adjust the intensity from transparent to intense.'

In my words: Hmm, not quite 'brilliant'. These shadows are quite the harsh mistress - they can look incredible, but they take substantial work. Let's take a look at the nitty gritty.

________________________________________________________________________________

Formula: The formula is quite typical of a baked product - the power itself is silky soft, but it's stiff in the pan, and as such requires a real 'rub' to yield any sort of good pigment. Once swatched, it can tend to fade quickly as you blend, and doesn't seem to really adhere well to skin. As such, a primer is an absolute must, and I would even recommend a base on top of that to really seal the colour. Without a primer, these tend to become very patchy and are frustrating to use for that reason; blending is essential with these as they are prone to rough edges due to being so metallic and sparkly, but as soon as you blend the colour disappears and you have to pack it back on again. I found when I tried to do an elaborate eye look with these it took wayyyy longer than usual, as I constantly lost intensity and had to reapply. That said, the finished look is stunning - especially if you use them wet, they are very sparkly and dimensional.

Pigmentation: Pigmentation ranges from semi-sheer to pretty opaque, depending on if you use them dry or wet. A dry application will give you a soft, satin wash of colour - these only really become vibrant when used wet, this is also when the micro-sparkle becomes prominent, too.

Longevity: It's not looking good, ladies. Without a primer, these start to patch off and fade after a few hours. I don't have particularly oily eyelids either - usually, eyeshadow lasts a good seven hours before I notice fading. This was very disappointing, but can be remedied with a good primer and base.

Ease of use: As mentioned above, these are quite frustrating to use, as you have to constantly reapply and you can't achieve a flawless eye look unless you really put time and effort in.

_________________________________________________________________________________

Swatches

25 - Pearly Periwinkle


Pearl Periwinkle is a cool medium-toned lilac. This was the worst performer out of the colours I bought - as you can see from the eye swatch, it had already started creasing (and I had it on for probably a minute before I took the picture!!). 

35 - Malachite Green


Malachite Green is (not a green at all) a cool icey blue. It had good pigmentation both wet and dry, but unfortunately was still quite patchy.

23 - Emerald Green


Emerald Green is, as described, a metallic emerald green. This was my favourite colour out of the bunch, as it applied a lot smoother and pigmentation was very good both dry and wet. 

_________________________________________________________________________________

To conclude...

If you're looking for a metallic, sparkly eyeshadow and are willing to work for that dazzling, eye-catching look, these may be for you. As stated above, these CAN be really stunning, and all of the problems can be remedied with a little more effort and some help from our good friend primer. However, if you're someone who doesn't have a lot of time to spend on their make-up and prefers a more minimalist look, these aren't for you. The shade range is good (Kiko also offer neutrals in this range) but unfortunately, as a one and done product, these jewel tones are just missing the mark slightly. 

RATING: C

- Soph

Thursday 17 March 2016

Natural Eyes and Ombre Lips Tutorial


Hi everyone! So today I thought it was about time I gave a little more love to the lips, and let the eyes take a beat seat for a while. This look is very easy, but is still dramatic. The ombre lip trend is very popular lately, and I can see why; it adds an extra somethin' somethin' to any look, and the soft gradient effect creates the illusion of bigger lips (which petite mouthed girls like myself can appreciate!)

First the eyes (I used the Too Faced Chocolate Bar Palette for this, but you can literally use any light brown and champagne eyeshadows)


And the lips...(Sorry if my lips look a bit blah - I was having a crappy lip day)


_________________________________________________________________

Other products use,..

  • Urban Decay 24/7 Glide on Lip Pencil - Venom
  • Maybelline Sensational Creamy Matte - Siren in Scarlet (lightly applied)
  • Bourjois Healthy Mix Foundation - Vanille Clair
  • Josie Maran Argan Illuminizer
  • Clinique Cheek Pop - Rosy Pop
  • Anastasia Brow Wiz - Dark Brown
  • L'Oreal Superliner Perfect Slim Black
- Soph

Tuesday 15 March 2016

Urban Decay Vice 3 - Cranberry Smokes Tutorial


Ah red eyeshadow - that double edged sword. Some say it causes you to look like you've been sniffing glue, but I think it's a light-eyed girls best friend.

Today I present to you this grungy, sexy look, which I created using mainly the Urban Decay Vice 3


The star of the show is of course, Sonic. (which is the red shadow at the bottom with the name cut out of the picture because I'm a total idiot) It's a beautiful, rich, rusty, cranberry gorgeousness (it's been a long day and the part of my brain that deciphers the intricacies of eyeshadows is malfunctioning). One piece of advice that I left out of the actual steps: it's crucial that you blend each time you add a new shadow, otherwise you will be paying homeage to Pete Doherty, and no one wants that. Let's just get down to it, shall we?

_________________________________________________________________________________


________________________________________________________________________________

Other Products Used...

  • Anastasia Brow Wiz - Dark Brown
  • YSL Touch Eclat Foundation - BR20
  • Hey Honey Good Morning Facial Serum
  • MAC Sheertone Blush - Peaches
  • Sleek Contour Kit - Light
  • TheBalm Mary Lou-Manizer
  • Anastasia Lipgloss - Sunset Strip
- Soph

Sunday 13 March 2016

St Patricks Day Make-up Tutorial ft Coastal Scents 252 Ultimate Palette


Happy St Patricks Day dudes and dudesses! What better way to celebrate such a beautiful spring day than to bedazzle your lids with various shades of green?! I decided to show some love to a more affordable palette, the Coastal Scents 252 Ultimate Palette


This is an amazing palette for those who want to experiment with colour but don't want to splurge on shadows they'll barely use, and I have to say, the quality is pretty damn good. Okay, it smells a bit like paint and some shades are a little bit dusty, but pigmentation is really up there. It comes with three pull out 'sheets'; 1 is composed of warmer colours (red, pinks, purples, etc), 2 is cooler shades (greens, blues, etc) and the last is a random mix. For this particular look, I used the cooler set of colours, and have labelled them according to which step they are used for your convenience.


_________________________________________________________________________________


Other products used...

  • Maybelline Fit Me Foundation - 115
  • MAC Strobe Cream
  • Urban Decay Gwen Stefani Blush Palette - OC
  • Anastasia Brow Wiz - Dark Brown
  • NYX Jumbo Eye Pencil - Milk
  • Kat Von D Ink Liner - Hemingway
  • Essence Lash Princess
  • Sleek Contour Kit - Light
  • Bare Minerals Marvellous Moxie - Super Star 
- Soph

Saturday 12 March 2016

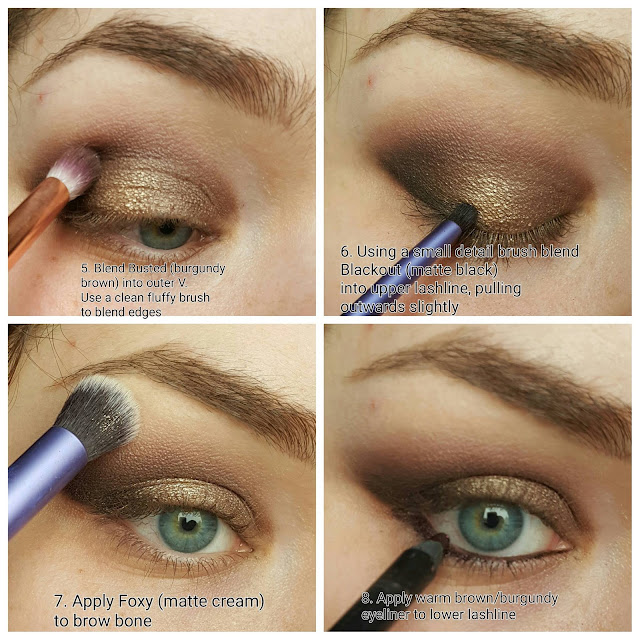
Urban Decay Naked 2 - Smoky Bronze Tutorial

NAKED 2/TUTORIAL/BRONZE SMOKEY EYE/URBAN DECAY

This is my sultry, sexy bronze smoky eye using the Urban Decay Naked 2 palette. Naked 2 is usually deemed the cooler of the Naked sisters (how wrong does that sound?!) so I wanted to challenge myself and show the versatility of this palette by creating something really warm. Lighting was not my friend today, so I must apologise for the tone distortion between some pictures.

NAKED 2/TUTORIAL/BRONZE SMOKEY EYE/URBAN DECAY

(You can really tell my palette is much loved...)

As with any smoky eye, you need to blend A LOT with this look to avoid the eyes looking muddy. Always keep a fluffy brush on standby (advice I feel we can all live by)

Onto the tutorial! 

NAKED 2/TUTORIAL/BRONZE SMOKEY EYE/URBAN DECAY

Other products used...

  • Maybelline Colour Tattoo 24 hr - On and On Bronze
  • Zoeva Graphic Eyes - Rock 'n' Roll Bride
  • Essence Princess Lash Mascara
  • L'Oreal Superliner Perfect Slim Black Intense
  • Anastasia Brow Wiz - Dark Brown
  • Olay Regenerist Luminous Skin Tone Perfecting Cream
  • So Susan Light Diffuser Illuminator and Bronzer Duo (Bronzer side)
  • Bourjois Healthy Mix Foundation - Vanille Clair
  • MAC Blush - Peaches
  • Seventeen Instant Glow Shimmer Brick - Pink Bronze
  • Guerlain Meterorites - Clair
  • Urban Decay 24/7 Glide On Lipliner - Liar
  • Bare Minerals Marvellous Moxie - Scene Stealer
- Soph

Glossybox UK - March 2016


So, if you haven't heard of Glossybox, it is beauty subscription box service that packages up 5 or 6 travel or full-sized products (cosmetics, skin care or haircare) and delivers them to your door once a month for just £10 plus P+P.  When you sign up, you also complete a survey, so that they can try to send out products more tailored to your needs - a very cool touch.

 I have been subscribed to Glossybox for exactly a year now (and they sent me a thank-you card this month just for that, so that's nice of them!) and I can honestly say I've never been disappointed. Sure, there have been a few products that I have felt 'meh' about (stick on fake-tattoo things... wha'?), but I have also discovered things that I would absolutely repurchase (basically the whole of the Naobay line) and on the whole I've really enjoyed experimenting with the products I have received. And that's the whole point of subscription boxes, I think, to experiment and try out things you normally wouldn't. If you're going into this with the hope that you're always going to receive coral-toned blushers and hair products that tame frizz, forget about it.

Let's get onto the products I received this month!

_________________________________________________________________________________

So Susan Light Diffuser Illuminator & Bronzer Duo 


Make-up is my favourite thing to receive in Glossybox, so I was clearly delighted with this. Upon opening the cute little pot (which was actually really difficult - I nearly snapped off my fingernail, so be careful about that!) the tones scared me a little bit - it looked far too dark to look natural on my fair skin. Thankfully, it translated quite differently once swatched.


The bronzer side is a light, warm terracotta brown, and the illuminator is a soft champagne with minute specks of gold glitter running through it. Thankfully, they are quite sheer, so they appear a lot more natural than they do in the pot. I found the formula to be quite thin, but still easy to blend without becoming patchy. The highlighter was a little bit crumbly, but once blended on the cheekbone it imparts a lovely, quite subdued glow. Both colours would be better suited to a warmer, complexion, but I found I could achieve quite a natural look on my cool, fair complexion thanks to the sheer formula. I would have liked if it was housed in a bigger container as it's a bit too small for a contour/highlighter brush (it's about the size of a regular eyeshadow), but on the whole I'm pleased with it and I can see myself getting some good use out of it. 

This was a full sized product, and is available to purchase for £14 from www.sosusan.com

_________________________________________________________________________________

Luxie Rose Gold Large Angled Face Brush 504


We rarely receive make-up brushes in Glossybox (I think I've received one before this), and as I'm a bit of a brush junkie, this was a really nice surprise. The packaging is gorgeous, and upon initial inspection, it seems like a well-made, sturdy brush. I think the name is a bit misleading, as it's not large by any means - the size and shape of it actually make it the perfect contour brush, as it really sits comfortably in the hollow of your cheek. It's also of course the perfect companion to the So Susan Duo. 


The brush itself is extremely soft - it feels lovely on the face. The bristles are fairly densely packed, but not so dense that you lose that fluffiness needed to blend powder well. I have contoured with this already and I found that the shape allowed me to control where I was placing the product, but the bristles had enough give to allow me to blend the product out well. The end result was a precise but still natural contour. Luxie is also a vegan, cruelty free brand, so that's an added bonus! This is probably my favourite thing in the box and will be my go-to contour brush. 

This brush is full sized, and is available for purchase from www.luxiebeauty.com for £10.42

_________________________________________________________________________________

Hey Honey Good Morning Honey Silk Facial Serum


I LOVE facial serums. Even though I'm only 24, I really feel like my skin is starting to age (I see you, crows feet!) so I'm on board with anything that claims to get deep into the skin's surface to fix all that nonsense. I've never heard of this brand before, but Glossybox claims that it 'replenishes and protects the skin, leaving you with a glowing complexion day after day.'

The serum itself is a thin light yellow (honey?!) liquid. I've used this once before moisturising and after toning, and holy crap, it made my skin SO SOFT. I suffer from combination skin, and the skin on my cheeks is quite lizard-esque, but this really softened them and made the texture on the whole a lot better. You need to use something like this consistently to really see the benefits, but I'm definitely enjoying it so far and will be continuing to incorporate it into my skincare routine. 

This is a travel sized product. The full-sized product can be purchased from www.heyhoney.com for £28.81

________________________________________________________________________________

Olay Regenerist Luminous Skin Tone Perfecting Cream


Olay is the only brand in this box I've heard of before - it seems to be a staple brand for Brits. This particular product seems like a multitasking product, but I have been using it as a primer beneath make-up as an extra boost for my skin. Glossybox claims it 'hydrates, exfoliates and smoothes the skin to leave you with a healthy, glowing complexion.' I found that as a primer (I'm probably using it totally wrong, I know) it acted as a moisturiser but also calmed down the redness in my skin and evened out my complexion. Again, it's one of those products you need to continue to use to see the benefits - I will definitely be doing that.

This product is a travel mini. The full-sized product can be purchsae from www.olay.co.uk for £29.99

_________________________________________________________________________________

-417 Catharsis Vitamin Mineral Shampoo and Conditioner


I've recently coloured my hair, so I'm definitely in the market for trying out new shampoos and conditioners! Glossybox claims that 'the combination of Dead Sea moisture balancing minerals, energising vitamins and essential oils in this duo ensure your hair is super gleaming, hydrated and lustrous.' I've used these both once already, and the first thing I noticed is that my hair was a lot more manageable. Usually, if I can get a brush through my hair post wash it's a small victory, let alone a comb, but after using these products I was able to comb my hair without tugging on any knots - it was quite amazing, actually. Also, I found that my my natural waves were more defined, rather than imitating Charles II as they usually do. I have very long hair and the bottles are quite small so I'm not sure how many washes I will get out of them, but so far, so good! 

This is a travel sized product. The full-sized product can be purchased from www.minus417.com for £16.89 each

_________________________________________________________________________________

Overall, I am very impressed with this month's box - it offered a good range of make-up, haircare and skincare, and though some products were not full-sized, the sizes were still very generous. You always get more than you pay for with Glossybox, so in my eyes it's absolutely worth it - it really is a lovely surprise each month. 

What did you think of this month's Glossybox?  

- Soph