Saturday, 30 April 2016

60s/Cleopatra Inspired Eye Tutorial

60s makeup/cleopatra makeup/tutorial

So you may be wondering, when did Cleopatra become a go-go boots lovin' groovy chick? Well, that day is today. Using Cleopatra's signature blue and sharp liner combined with the intense crease and heavy lower lash line favoured by 60s ladies, I created this very doe-eyed look (if you have big eyes already your eyes are going to look HUGE using these techniques). It's not something I would do everyday, but it's definitely very fun!

60s makeup/cleopatra makeup/tutorial

_________________________________________________________________________________

Products used...
- Urban Decay Password Eyeshadow - (step 1)
- Urban Decay Dagger Eyeshadow - (step 2)
- Urban Decay Madness Eyeshadow - (step 3)
- Urban Decay Blackout Eyeshadow - (step 4)
- Urban Decay Strange Eyeshadow  - (step 6)
- L'oreal Super Liner Perfect Slim Black Intense
- Essence Lash Princess
- Nyx Micro Brow - Brunette
- Nyx Control Freak Eyebrow Gel
- Bourjois Healthy Mix Foundation - Vanille Clair
- MUA Blusher - Candyfloss
- Urban Decay 24/7 Glide-on Lip Pencil - Native
- Urban Decay Revolution Lipstick - Native

- Soph

Tuesday, 26 April 2016

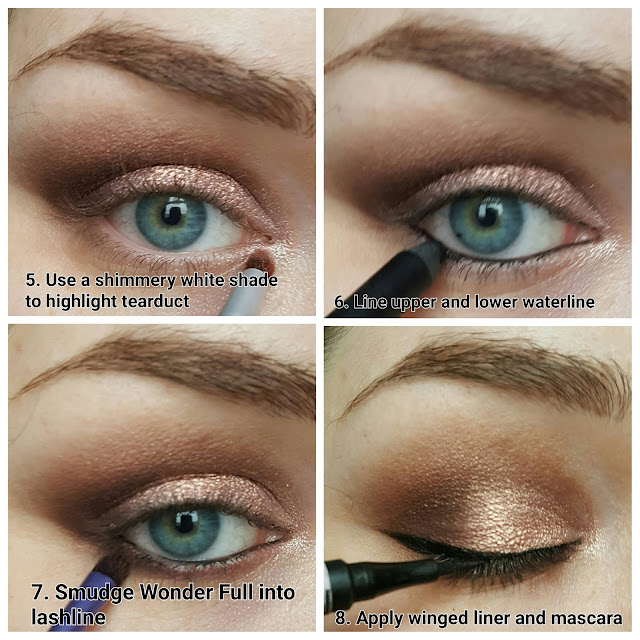
The Naked Series: Easy Grey Smoky Eye FT Urban Decay Naked Smoky

SMOKY EYE/URBAN DECAY/NAKED SMOKY/SMOKY EYE TUTORIAL/EASY SMOKY EYE

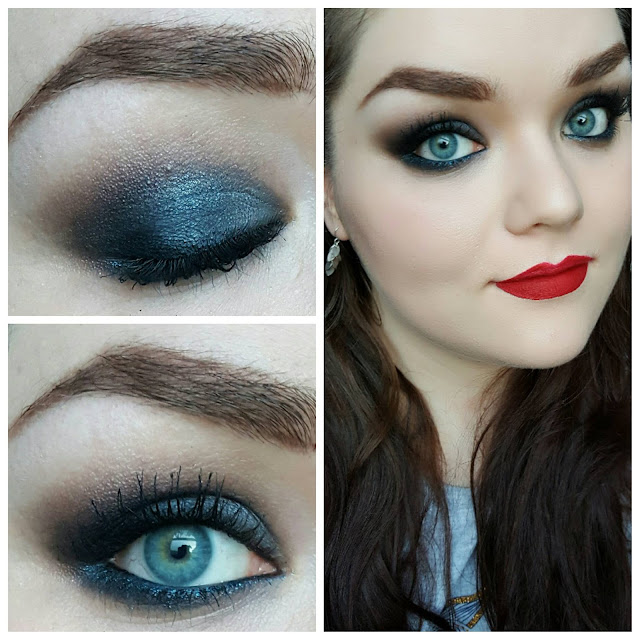
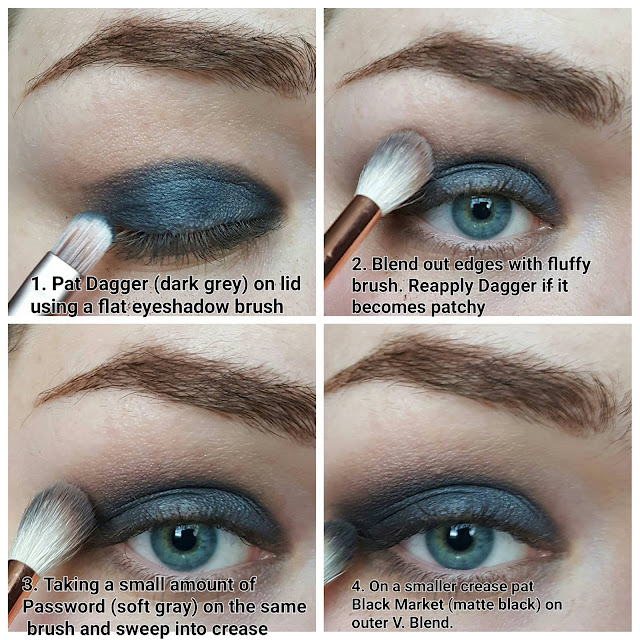
After having this blog for nearly two months, and producing many different looks, only now do I realise that I have not done a tutorial on the ESSENTIAL - the traditional grey smoky eye. This is probably the most timeless make-up 'technique', and looks stunning on all eye colours, shapes, sizes. I added a bit of a twist with a cool blue waterline, but it still looks very classic. I feel a lot of people are intimidated by smoky eyes because they seem so complicated, but this look is very simple and easy to achieve.

SMOKY EYE/URBAN DECAY/NAKED SMOKY/SMOKY EYE TUTORIAL/EASY SMOKY EYE

Finished look

_________________________________________________________________________________

Other products used...
- Nyx Micro Brow - Brunette
- Nyx Control Freak Brow Gel
- Zoeva Graphic Eyes+ - Black to Earth (step 5)
- Zoeva Graphic Eyes+ - Cool Factor (step 7)
- Yves Saint Laurent Le Teinte Touche Eclat Foundation - BR20 (Cool Ivory)
- Makeup Revolution Blush Palette
- Nyx Blush - Taupe (contour)
- Stila Liquid Lipstick - Fiery


Thursday, 21 April 2016

Lilac Sparkle Makeup Tutorial


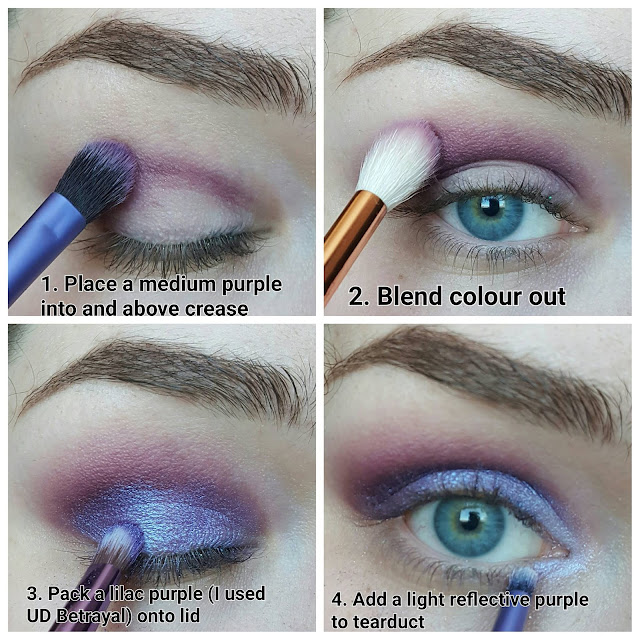
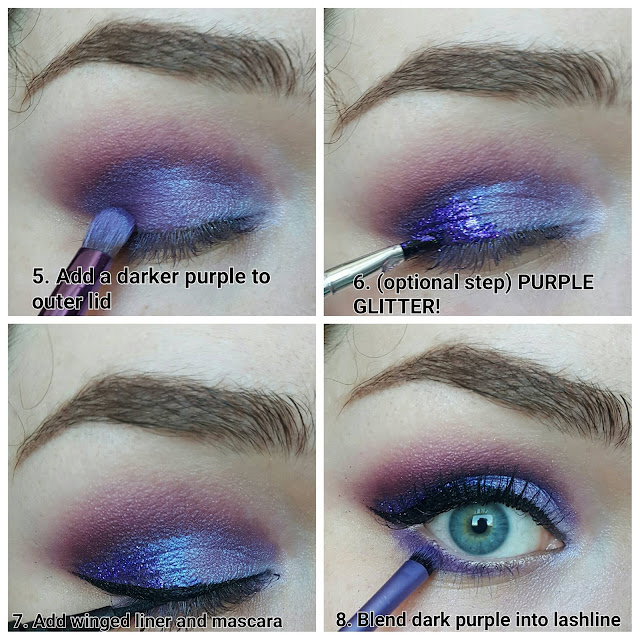
Hi guys! Welcome to another tutorial featuring my favourite colour - PURPLE! I don't wear this colour enough (probably because I'm constantly experimenting with my ridiculously huge hoard of make-up...) This look is using ANOTHER Lit Cosmetics Glitter - Disco Diva. I think I might just set up a direct debit to Lit Cosmetics but ANYWHO. I hope you enjoy!

LILAC MAKEUP TUTORIAL


Finished look

________________________________________________________________________________

Product used...
- Makeup Gallery Colour Story Eyshadow - Deep Plum 17 (step 1)
- Urban Decay Eyeshadow - Betrayal (step 3)
- Urban Decay Eyeshadow - Aura (step 4)
- Sleek Ultra Matte V2 palette - Highness (step 5 and 8)
- Lit Cosmetics Glitter - Disco Diva (step 6)
- L'oreal Superliner Perfect Slim Black Intense (step 7)
- Nyx Micro Brow - Brunette
- Bourjois Healthy Mix Foundation
- Make-up Revolution Contour Kit (contour)
- The Balm Mary-Lou Manizer
- Urban Decay Afterglow Glide-On Cheek Tint - Crush
- Nyx Lip Liner - Rose
- MAC Cremesheen Lipstick - Shy Girl
- Anastasia Beverly Hills Lip Gloss - Dainty

- Soph

Tuesday, 19 April 2016

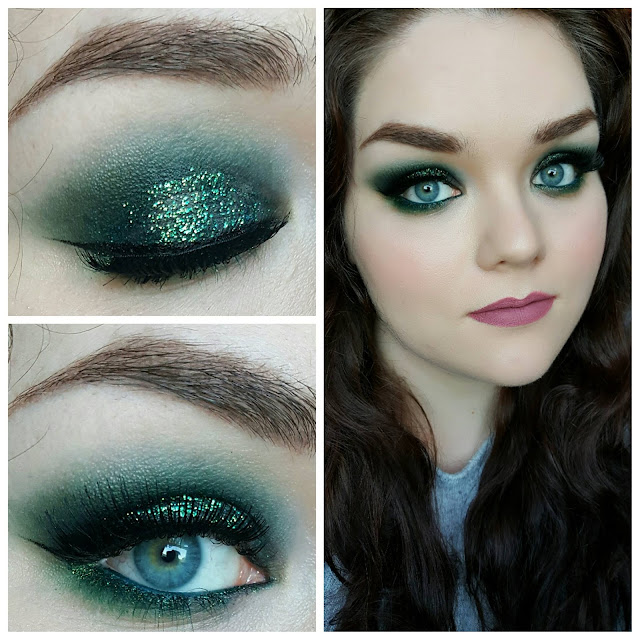
Glittery Green Goddess Makeup Tutorial

GLITTERY GREEN EYES

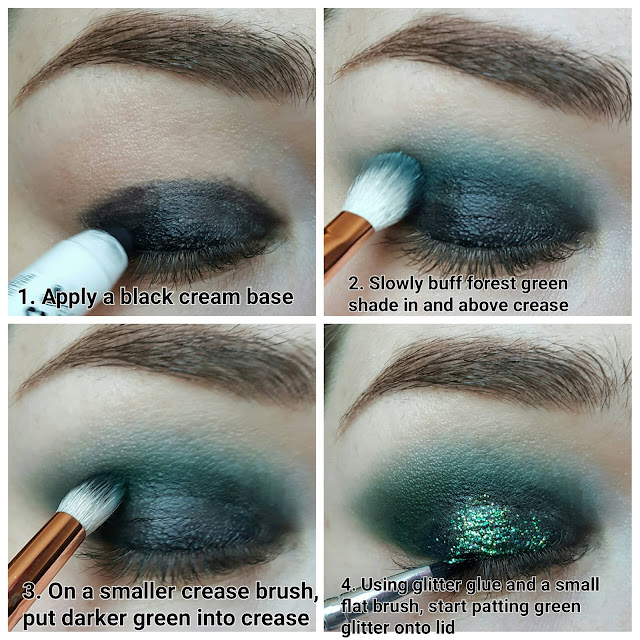
So someone just received an order of GLITTER. I created this beautiful hydra-esque (according to my little sister) look using Sleek Ultra Matte V2 palette and the star of the show, Lit Cosmetics Glitter in Magic Dragon. This is also the first time I've experimented with lashes (you just have to with glitter). I just love this look. LOVE IT.

GLITTERY GREEN EYES

Finished look
_________________________________________________________________________________

Other products used...
- Nyx Jumbo Pencil - Black Bean (step 1)
- L'Oreal Super Liner Perfect Slim - Black Intense (step 5)
- Rimmel Volume Colourist Mascara
- Nyx Micro Brow - Brunette
- Bourjois Healthy Mix Foundation - Vanille Clair
- The Body Shop Oils of Life Facial Oil
- MUA Blush Perfection Cream Blusher - Dolly
- Makeup Revolution Contour Palette (contour and highlight)
- Stila Liquid Lipstick - Patina

- Soph

Sunday, 17 April 2016

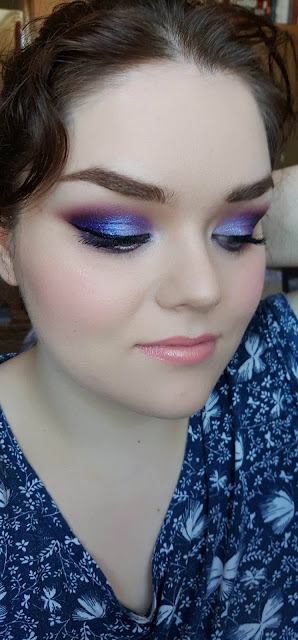
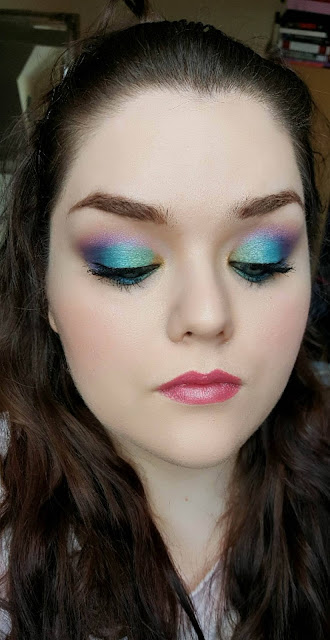
Easy Rainbow Eye Tutorial

RAINBOW EYE TUTORIAL/RAINBOW, EYES, MAKEUP, TUTORIAL

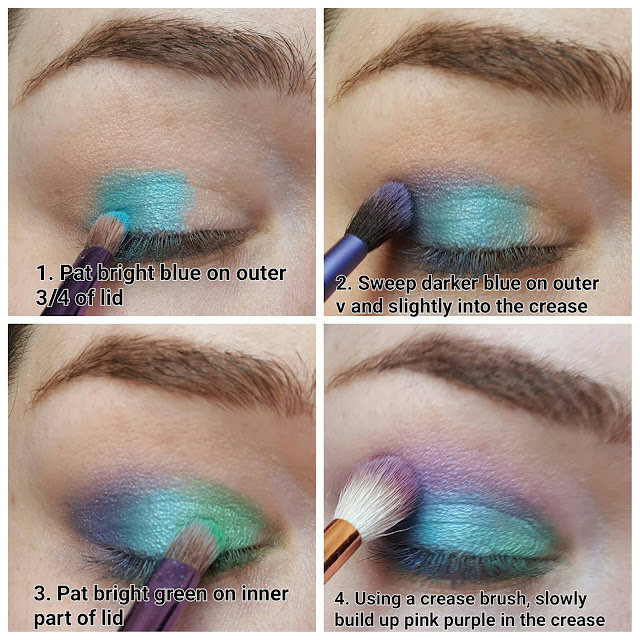
As we're coming into warmer weather (am I being too optimistic, fellow brits?!) I thought it would be nice to crack into the rainbow colours, and leave the neutrals at the door for a bit. This is a very easy look to achieve, without compromising the drama one would effect with rainbow colours. I used an old UD palette (Deluxe Shadow Box, anyone?) but all you need is any dark blue, bright blue, bright green, gold and pinky purple, and you're good to go! I played down the liner as I really wanted the colours to stand out. This would be a great look for carnivals, festivals, parades - anywhere that you're really letting your hair down!

RAINBOW EYE TUTORIAL/RAINBOW, EYES, MAKEUP, TUTORIAL

Finished look
_________________________________________________________________________________

Other products used...
- Rimmel Volume Colourist 
- L'oreal Super Liner Perfect Slim Black Intense 
- Nyx Micro Brow - Brunette
- Yves Saint Laurent Le Teinte Touche Eclat Foundation - BR20 (Cool Ivory)
- Accessorize Merged Baked Blusher - Sensation 
- Nyx Blush - Taupe (contour)
- MUA Lipstick - Shade 6 

- Soph

Saturday, 16 April 2016

Zoeva Graphic Eyes+ Review: Taupe, Regency, Mr Marvelous and Black to Earth

ZOEVA GRAPHIC EYES REVIEW/TAUPE, REGENCY, MR MARVELOUS, BLACK TO EARTH, REVIEW, SWATCHES


Zoeva Graphic Eyes+ is an eyeliner pencil that promises 'extra smooth texture' in an array of 'highly pigmented intense colours'. Each pencil contains 0.04 oz of product and is available to purchase from BeautyBay and Zoeva for £7.00 each.

_________________________________________________________________________________

TAUPE


Taupe is a reflective cool taupe (it looks almost lilac in certain lighting). It is pretty opaque in one swipe, and can be built up to look more intense and metallic in two swipes. I had to swipe the product back and forth a few times, but once on it lasted six hours on the waterline, and application was very easy as the formula was very creamy. 
                                                                   
PIGMENTATION: 3.5/5
EASE OF USE: 4/5                                                                    
TEXTURE: 5/5
LONGEVITY: 3.5/5

FINAL SCORE: 16/20
FINAL GRADE: A                                                                                                                                                         
_________________________________________________________________________________

REGENCY


Regency is a medium violet. It had semi-opaque colour in one swipe and can be built up to fully opacity in two, HOWEVER, I found it quite difficult to build up opacity on the waterline (as you can see in my eye swatch, the colour is quite faded). The texture was creamy and as such, it wasn't painful at all to apply. It started to fade after 7 hours, but a fair amount of colour held on even after this time.

PIGMENTATION - 3.5/5
EASE OF USE - 4/5
TEXTURE - 5/5
LONGEVITY - 4/5

FINAL SCORE: 16.5/20
FINAL GRADE: A
______________________________________________________

Mr. Marvelous


Mr. Marvelous (great name) is a blackened base with blue and purple micro-sparkle. Due to this sparkle it was a tiny bit gritty, and it actually irritated my eyes a bit (not the fault of the product at all - Zoeva actually state that these eyeliners are not suitable for the waterline but I'm a bit of a daredevil, y'see). It took a few swipes to build up pigmentation, but it lasted a good 7 hours in the waterline once set.

PIGMENTATION: 3.5/5
EASE OF USE; 4/5
TEXTURE: 3/5/5
LONGEVITY: 4/5

FINAL SCORE: 15/20
FINAL GRADE: A-
_________________________________________________________________________________

Black to Earth


Black to Earth is a rich matte black. Bold statement time - this eyeliner is outstanding - it metaphorically kicks the crap out of UD's Perversion, which used to be my favourite black eyeliner. This shade is intensely pigmented in one swipe, beautifully creamy and lasted 9 hours on the waterline (it would have lasted longer I'm sure, but I needed to take my make-up off. It was actually a bit of a pain to take off it's THAT good). An absolute pleasure to use, and my new holy grail black eyeliner. 

PIGMENTATION: 5/5
EASE OF USE: 5/5
TEXTURE: 5/5
LONGEVITY: 5/5

FINAL SCORE: 20/20
FINAL GRADE: A+


Stay tuned for the rest of the shades! 

- Soph

Friday, 15 April 2016

Warm Rose Gold Eyes FT Zoeva Rose Gold Palette

ZOEVA ROSE GOLD/ZOEVA ROSE GOLD PALETTE, MAKEUP, TUTORIAL

Hi all! I'm back with ANOTHER warm rosy look (I know, I know...). This is featuring the Zoeva Rose Gold Palette, and the Bare Minerals Rose Gold pigment (which is the most beautiful pigment on the planet... probably)


This palette is only £15 on Beautybay and it's incredible quality - definitely recommend the Zoeva palettes! 


Finished Look

________________________________________________________________________________

Other products used...

- Nyx Jumbo Eye Pencil - Milk (step 1)
- Rimmel Volume Colourist Mascara 
- L'oreal Super Liner Perfect Slim Black Intense
- Kiko Skin Tone Corrector Primer - Green
- Lancome Teinte Idole Ultra 24 - 010
- Barbara Daly Light Effect Concealer Pen - Light
- Makeup Revolution Contour Kit (contour)
- Makeup Revolution Vivid Baked Highlighter - Peach Lights
- Barbara Daly Velvet Powder Cheek Colour - Fresh
- Estee Lauder Pure Colour Long Lasting Lipstick - Pinkberry Creme

- Soph

Tuesday, 12 April 2016

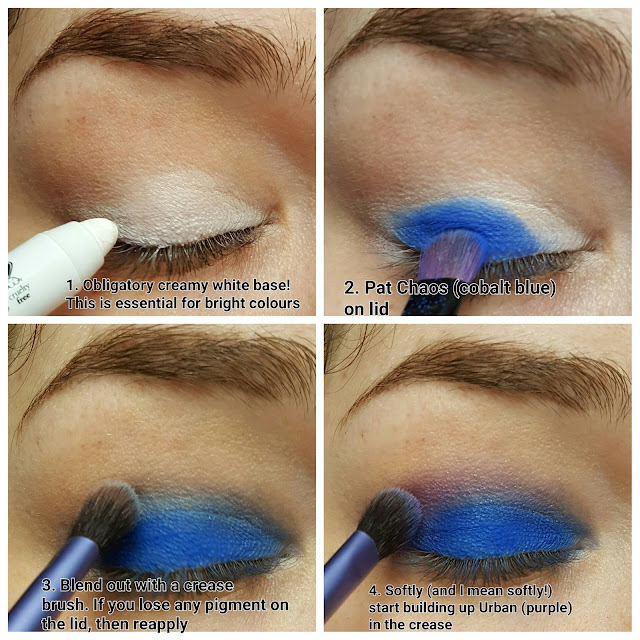
Cobalt Gradient Eye FT Urban Decay Electric Palette

ELECTRIC PALETTE TUTORIAL/URBAN DECAY/BLUE/PURPLE/SMOKY EYE/TUTORIAL

Hi guys! And welcome to another Electric Palette tutorial, featuring quite possibly the most gorgeous blue eyeshadow ever. Seriously, this colour is so unique to me - a rich, true cobalt blue - and the pigment is just out of this world. This is one of those tutorials that really requires patience (and a fair amount of wrist stamina (is that a thing?) as blending is going to be your best friend) You really need to build the colour slowly to create that gradient effect, but that effort really pays off. I hope you enjoy!

ELECTRIC PALETTE TUTORIAL/URBAN DECAY/BLUE/PURPLE/SMOKY EYE/TUTORIAL

Finished look

_________________________________________________________________________________

Other products used...
- Nyx Jumbo Pencil - Milk (step 1)
- L'oreal Super Liner Perfect Slim Black Intense (step 11)
- Essence Lash Princess
- Nyx Micro Brow - Brunette
- Bourjois Healthy Mix Foundation - Vanille Clair
- Makeup Revolution Contour Palette (contour and highlight)
- Illamasqua Velvet Blusher - Peaked
- Urban Decay 24/7 Glide on Lip Pencil - Venom 
- Makeup Revolution Intense Kisses High Intensity Gloss - Sweet Nothings

- Soph


Sunday, 10 April 2016

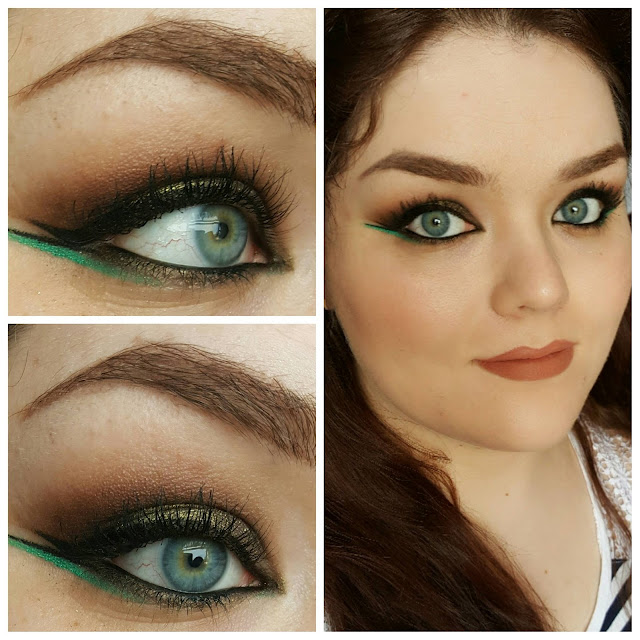
Modern Golden Olive Eyes with Geometric Eyeliner FT Urban Decay Vice 4

VICE 4 TUTORIAL/URBAN DECAY TUTORIAL/MAC GOLDEN OLIVE PIGMENT/GEOMTRIC EYELINER

So, you thought this was going to be a simple, pretty olive eye? Yeah, me too - and then I discovered Stila Smudge Stick in Emerald and it all got a little crazy from there. I think the hint of light turquoise combined with the sultriness of that olive green creates a beautiful, modern look. I used the Urban Decay Vice 4 for this look, but if you have a dark brown, olive green and a lighter green eyeliner, you're good to go!

VICE 4 TUTORIAL/URBAN DECAY TUTORIAL/MAC GOLDEN OLIVE PIGMENT/GEOMTRIC EYELINER

VICE 4 TUTORIAL/URBAN DECAY/MAC GOLDEN OLIVE PIGMENT/GEOMTRIC EYELINER

_________________________________________________________________________________

Other products used...
- Nyx Micro Brow - Brunette
- Maybelline Master Pricess Liquid Eyeliner
- Zoeva Graphic Eyes+ - Black to Earth
- Essence Lash Princess
- Yves Saint Laurent Le Teinte Touche Eclat Foundation - BR20 (Cool Ivory)
- So Susan Statement Skin Highlighting Crayon - Starlight
- Makeup Revolution Contour Palette (contour)
- Sleek Blush - Pomegranate
- Urban Decay 24/7 Glide on Lip Pencil - Liar (to line lips, blended in slightly)
- Urban Decay 24/7 Glide on Lip Pencil - Naked (centre of lips)

- Soph

Friday, 8 April 2016

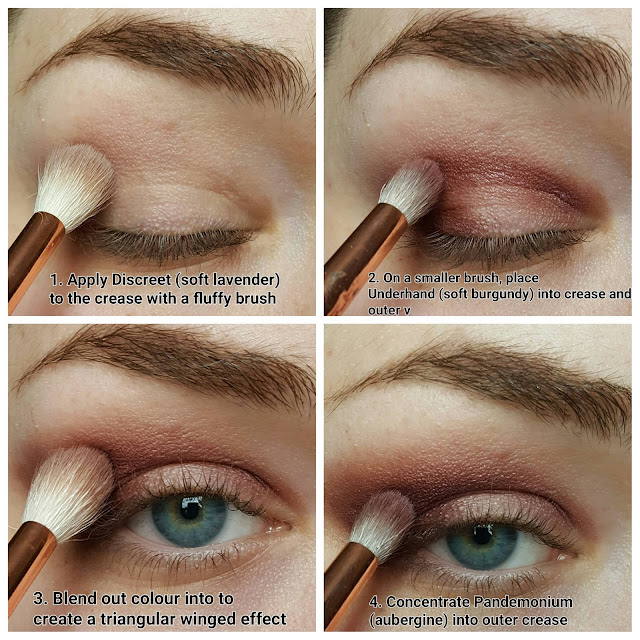
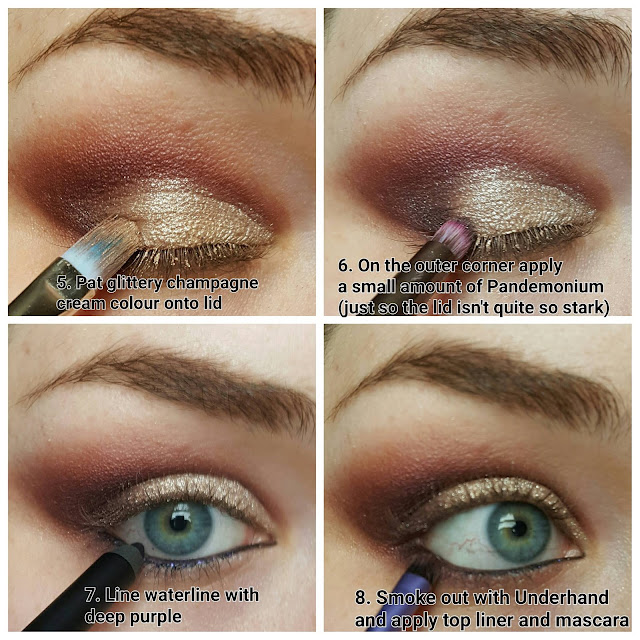
Soft Cut Crease and Champagne Lids FT Urban Decay Vice 4

VICE 4 TUTORIAL/CUT CREASE/CHAMPAGNE EYESHADOW/PURPLE EYESHADOW/URBAN DECAY

I know what you're going to say - "GODDAMN WOMAN! Lay off the warm tones! We all love a good burgundy but Jesus." Sorry about that - warm tones are my crack! I tried to make this a little different by adding a contrasting lid colour. There's something quite Arabic about this look - as if Shakira the Moroccan belly dancer would be sporting it whilst she shakes her maracas (oi oi) at Fat Dave from Middleborough - or is that just me?! It's the end of a long work week - forgive me!

VICE 4 TUTORIAL/CUT CREASE/CHAMPAGNE EYESHADOW/PURPLE EYESHADOW/URBAN DECAY
Finished look

________________________________________________________________________________

Other products used...

- Younique Splurge Cream Eye Shadow - Elegant (Lids)
- Zoeva Graphic Eyes+ - Mr Marvelous - (Step 7)
- L'oreal Superliner Perfect Slim - Black Intense
- Essence Lash Princess
- Nyx Micro Brow - Brunette
- Kiko Colour Corrector Primer - Green
- Yves Saint Laurent Le Teinte Touche Eclat Foundation - BR20 (Cool Ivory)
- Makeup Revolution Contour Palette (contour and highlight)
- Sleek Blush - Pomegranate 
- Stila Liquid Lipstick - Aria

_______________________________________________________________________________

Seriously though, help me get out of my 'warm' slump - what tutorial would YOU like to see?! 

- Soph

Wednesday, 6 April 2016

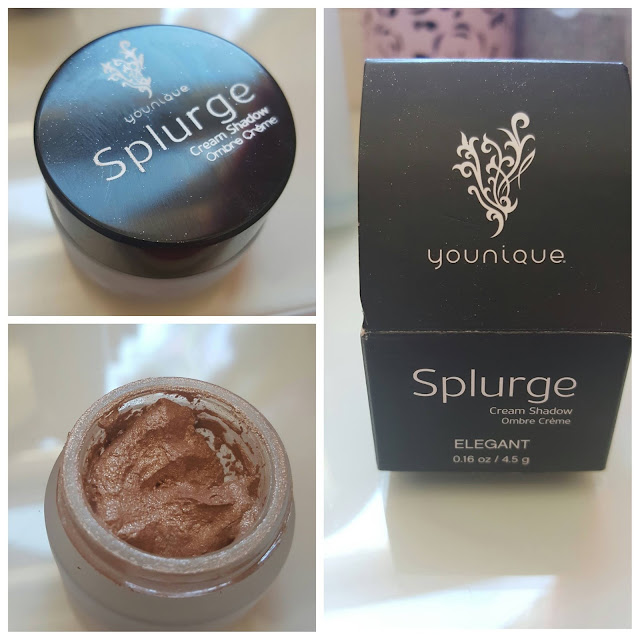
Younique Splurge Cream Eyeshadow Review

YOUNIQUE SPLURGE EYESHADOW/REVIEW/SWATCHES

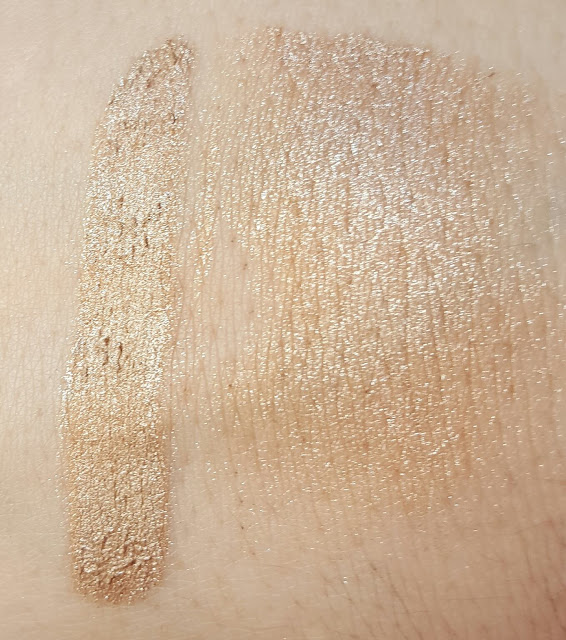
Younique Splurge Cream Eyeshadow is a £21 (!) 'high-density, velvety-smooth cream eyeshadow.' The colour Elegant is a beige/champagne/taupe base (honestly, it looks SO different in different lightings) with a layer of silver micro-glitter. I must mention that I did not purchase this product - my friend is a Younique ambassador and she gave it to me for review purposes. This of course, would never sway my honest opinion (keeping it real, folks!)

_________________________________________________________________________________

Formula: This is honestly the strangest texture of eyeshadow I've ever come across (I don't mean that in a bad way, it's very intriguing!). It's a whipped, silky soft mousse that almost wobbles if you poke it. It's nowhere near as stiff as a conventional cream eyeshadow (think Maybelline Colour Tattoos). It's quite thick, but as it's so smooth, it can be sheered out nicely without it becoming patchy. I swatched this on my arm, and even after I removed it, my skin felt so soft. I don't think Younique mention that it has any skincare properties, but hey, I wouldn't be surprised if it did! What makes this younique (geddit?) in my opinion is how dazzling it is, and how the moussey texture manages to lock in that glitter - I've never come across another cream eyeshadow that has such a well formulated glitter layer - you can really create a multi-dimensional eye look with very little effort. That's definitely a massive selling point, I think. One negative would be that if you suffer from textured lids, the thick formula might emphasise that.
Rating: 4/5

Pigmentation: It is pretty damn pigmented. Although it's a very neutral colour, it was still very opaque, and if opacity is not your cup of tea, it can be sheered out nicely while still retaining a good amount of pigment. This particular colour also makes quite a pretty (though dramatic) face highlighter .
Rating: 4/5

Ease of Use: The formula of this eyeshadow makes it very, very easy to create a one-and-done look, and if you're not an expert at makeup, I would recommend it purely for that reason. It applies nicely and easily to the lid (I prefer to use a flat, synethic brush) and is surprisingly easy to blend out. One thing to mention though is that if you do blend it, you're going to blend the glitter also (you can see I made this oopsie in my eye swatches below). As such, I recommend that you apply any matte shadows before this.
Rating: 5/5

Longevity: This really wears for a surprisingly long time. When I first swatched this my initial thoughts were (there is no wayyyy this is going to wear a long time without creasing) - the formula just feels like it will lend itself inevitably to creasing, seperation, all of that nastiness, but no my friend! I wore this for almost eight hours today, and each time I went to check, I expected a hot glittery mess but it really held it's own. I imagine it would start creasing at some point, but for a glittery cream shadow without any primer to still be pretty much perfect after almost eight hours of wear, that is seriously commendable.
Rating: 5/5

______________________________________________________________________________

To conclude... For a single eyeshadow, this is very expensive, and I was completely skeptical at first. How could this be any better than other, cheaper cream eyeshaows? Surprisingly, there are actually qualities that make this worth the money. As mentioned previously, it's pretty fascinating how well the glitter adheres to the formula, and how it's not a boring glitter either - when it captures the light it is very intense and complex (the pictures really don't do it justice), making it seem like you put more work in than you actually did. Which brings me onto my next point - ease of use. If you're looking for a dramatic eye with little effort that's going to last all night, this really is your guy. With a darker crease colour and some liquid liner, it'd look beyond stunning.

For those that are looking for a work-horse shadow with a bit more pizzazz than your bog-standard browns, this is really worth investing in, I think. A unique formula that just works

GRADE: A
_________________________________________________________________________________


YOUNIQUE SPLURGE EYESHADOW/REVIEW/SWATCHES

Artificial light

YOUNIQUE SPLURGE EYESHADOW/REVIEW/SWATCHES
Direct natural light


(On lid with dark brown in crease)


- Soph
Tuesday, 5 April 2016

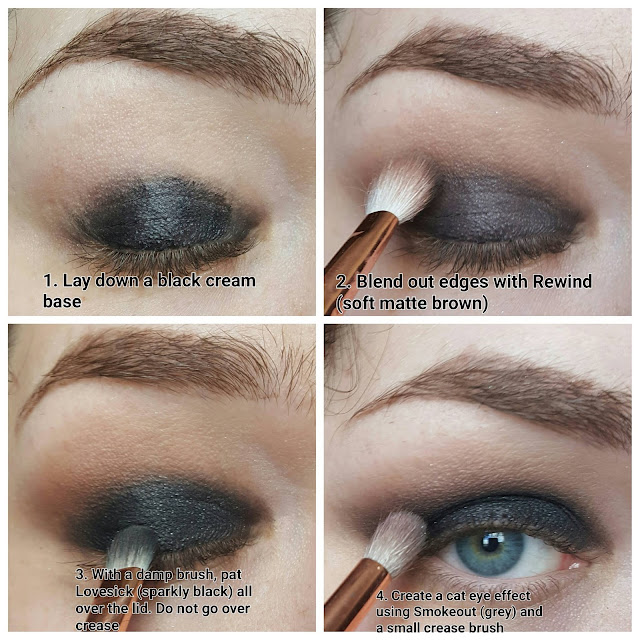
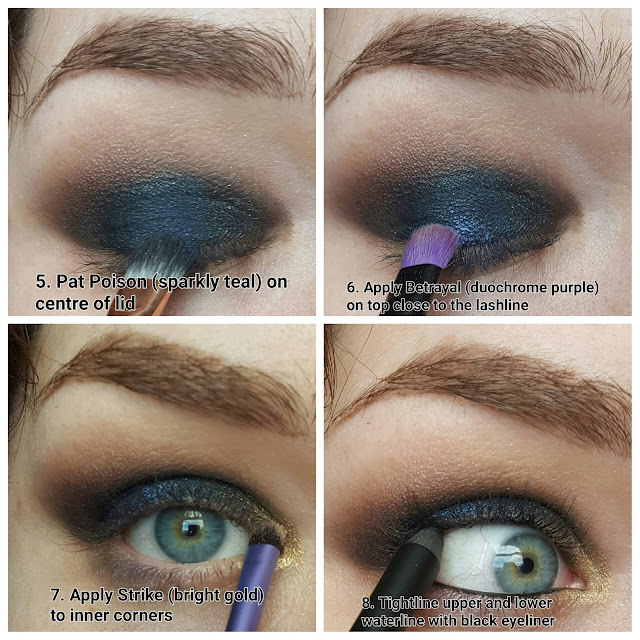
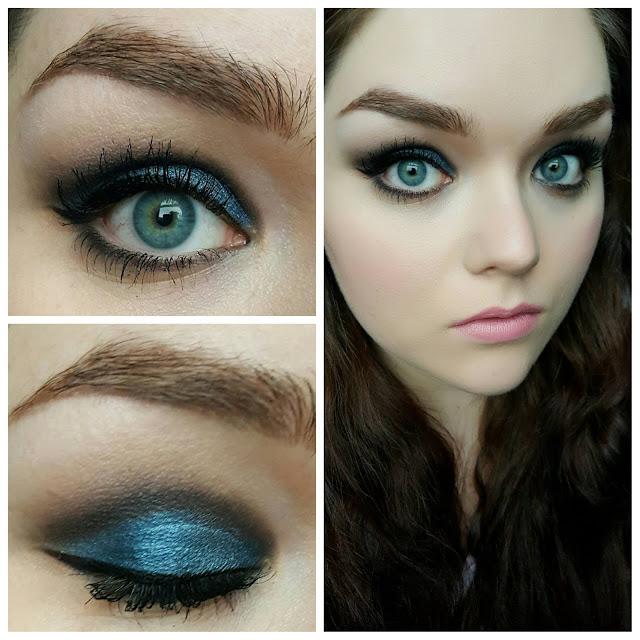
Midnight Blue and Gold Eyes FT Urban Decay Vice 2


Hello gorgeous smokiness! This look was created using the Urban Decay Vice 2 palette. Sadly, I don't think you can purchase this anymore, but the colours are fairly dupable. I hope you enjoy!

VICE 2 TUTORIAL/URBAN DECAY/BLUE SMOKEY EYES/GOLD/SWATCHES

_______________________________________________________________________________

Other products used...
- Nyx Jumbo Pencil - Black Bean (step 1)
- Nyx Micro Brow - Brunette
- L'Oreal Superliner Perfect Slim Black Intense
- Bourjois Healthy Mix Foundation
- Urban Decay Gwen Stefani Blush Palette - Angel (highlight) and Easy (blush)
- Coastal Scents Eclipse Palette - Contour
- Stila Liquid Lipstick - Caramello

- Soph